

Getting started in the world of .Net and C# isn’t easy; I have a JavaScript background and it was tough for me at least. So, here is a simplified walk through of creating a “Code-First” database using the Entity Framework. Code First is a convention where by you write code (models) to represent entities in the yet-to-be-created database, and let Entity Framework create the database for you. Confused? Hopefully not after reading this.
First things first… create a .Net C# Project, it can be of any type (MVC, WebAPI, WPF, etc). For this tutorial, I’ll be using a simple Web API. If you’re using VS2015 (Or .Net 4.5.2), Entity Framework 6 should already be installed and referenced in your project. If not, use NuGet to install the latest version of Entity Framework before moving on.
It’s time to start creating our models to represent entities in our database. In the Models folder, right click and create a new class named Contact.cs for our Contacts entity; we’re going to be making a simple app web service, to return contact information.
In here, we want to specify what properties a Contact can have, like a name, phone number and email address:
public class Contact
{
    public int Id { get; set; }
    public string FirstName { get; set; }
    public string LastName { get; set; }
    public string PhoneNumber { get; set; }
    public string Email { get; set; }
}
Now that we have that, we need to create a Database context. This is what Entity Framework will use, not only create a database for us, but the tables as well. Create a folder named “DAL” in the root of your project, this stands for Data Access Layer, which is the piece we’re creating next. Create the class ContactsContext.cs within the DAL folder (This can be called whatever you want, I’m just using Contacts because that’s what our app is all about.):
public class ContactsContext : DbContext
{
    public virtual DbSet<Contact> Contacts { get; set; }
}
Notice the :DbContext, that’s how Entity Framework knows what we want in our database; it creates a table for each DbSet we provide. You’ll have to right click > resolve a few dependencies to get this to work. With this in place, we’re ready to let EF do some magic for us, we’re using Entity Framework scaffolding to generate the WebAPI code needed, based off our Contacts class!
Right click on your Controllers folder, and Add > Controller… – you’ll see a list of different controller options, for this tutorial, lets use the Web API 2, with actions, using EF template:

Click “Add” and you’ll see this next screen pop up, this is where we tell Entity Framework’s scaffolding, what class and database context we want to use. Fill it in like I did below:
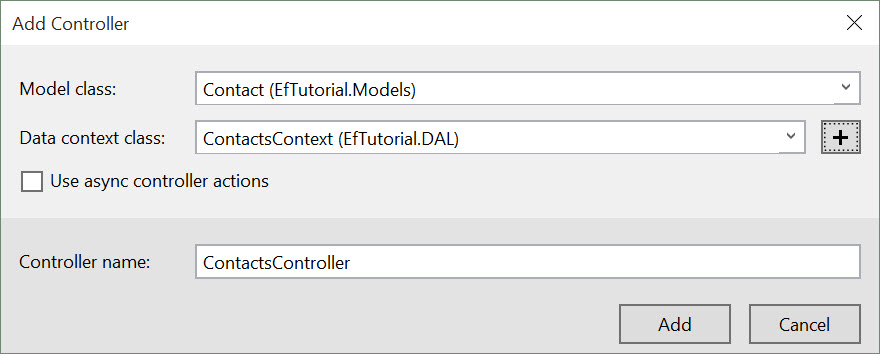
Click “Add” again and Entity Framework’s magic begins to happen! This creates the entire ContactsController for us, and we will be able to use that to query the database using the Web API! Lets take a look at some the ContactsController, you’ll notice they’ve added comments, with an example of how to use that API route:
// GET: api/Contacts/5
[ResponseType(typeof(Contact))]
public IHttpActionResult GetContact(int id)
{
    Contact contact = db.Contacts.Find(id);

    if (contact == null)
    {
    return NotFound();
    }

    return Ok(contact);
}
Another thing to notice, is that this API is Restful, and supports full CRUD operations. They’ve already created GET, PUT, POST and DELETE endpoints in there for us, which is really handy. You might be wondering where these routes get mapped, because the method name does not match the endpoint. Well, in the App_Start folder, there is a class named WebApiConfig.cs. This is the default route mappings, for all classes inherited by the ApiController:
// Web API routes
config.MapHttpAttributeRoutes();

config.Routes.MapHttpRoute(
    name: "DefaultApi",
    routeTemplate: "api/{controller}/{id}", // Notice this line here, it's looking for the controller
    defaults: new { id = RouteParameter.Optional }
);
So, depending on the controller you specify, and the operation you perform ( GET, PUT, POST, DELETE ), that’s how it routes to the right method.
Moving on! Now that we have everything in place, we will need to populate the database with some test data. Entity Framework provides us a way to seed our database on creation, I’ll show you how to do that now.
First things first, let’s enable migrations on our database. This will allow us to update the database easily, as our model changes. To do so, open the Package Manager Console, by going to Tools > NuGet Package Manager > Package Manager Console. Inside the console, type the following:
Enable-MigrationsNotice how this creates a Migrations directory in our project, inside of there you will find a Configuration class. This is where we can modify our seed method, and populate the database with test data.
Put the following code inside your Configuration class’s Seed method:
protected override void Seed(EfTutorial.DAL.ContactsContext context)
{
    context.Contacts.AddOrUpdate(
        new Contact {
            FirstName = "Brandon",
            LastName = "Tillman",
            PhoneNumber = "(123) 456-789",
            Email = "[email protected]"
        }
    );
}
Now when the database updates, it will seed it with that new contact. Before we can update the database, you will most likely need to add an initial migration. Go ahead and run the following from the Package Manager Console:
Add-Migration initFrom the Package Manager Console, we can also update our database:
Update-DatabaseAt this point, you should be able to run your project, and see that the database was populated with the seed data. I’m going to use my Web API route to verify; in my web browser, I can navigate to http://localhost:49465/Api/Contacts, and see the contact created:
<ArrayOfContact>
    <Contact>
        <Email>[email protected]</Email>;
        <FirstName>Brandon</FirstName>;
        <Id>1</Id>
        <LastName>Tillman</LastName>
        <PhoneNumber>(123) 456-789</PhoneNumber>
    </Contact>
</ArrayOfContact>
There you have it! A working database, using code first conventions. Please let me know if you have any questions, and I would be happy to help!